Cake pops are bright, bite-sized treats that bring joy from the very first glance. They combine crumbled cake and frosting to create sweet, round morsels on a handy stick. If you’ve ever experienced the thrill of indulging in a small but satisfying dessert, you’ll understand why cake pop flavors are so popular. They’re fun to eat, easy to share, and perfect for everything from simple family gatherings to big celebrations.
The beauty of cake pops lies in their versatility. A standard chocolate or vanilla cake can transform into charming little orbs with a smooth candy coating. You can roll them in sprinkles, drizzle them with melted chocolate, or top them with cookie crumbs. You can also infuse your favorite flavors—like lemon, red velvet, or even cinnamon—to add flair and variety. Each pop holds its shape well and fits neatly in the hand, offering a compact slice of cake in a portable form.
Many people love cake pops because they look festive and taste amazing. Their size makes them less messy than cupcakes, and the decorating choices are endless. You can keep it basic by dipping them in white chocolate and tossing on rainbow sprinkles, or you can create a more elaborate design by mixing in leftover cookie bits. Whether you’re celebrating a birthday or simply craving a quick snack, cake pops are easy to serve and always draw smiles. They also store well in the fridge or freezer, so it’s possible to make them ahead of time and have a handy sweet treat when the mood strikes.
In the upcoming sections, we’ll explore five cake pop flavors that spark happiness for everyone. We’ll cover key benefits, walk through a practical ingredients list, outline easy instructions, and share pro tips on how to decorate and serve them in style. Let’s begin!
Table of Contents
Key Benefits
Cake pops are convenient, fun, and easy to enjoy. Each bite-sized piece is filled with moist cake and a sweet coating, creating a flavor-packed dessert that appeals to kids and adults alike. They also help with portion control since you can serve small treats instead of large cake slices. Whether you prefer classic vanilla or rich chocolate, it’s simple to adjust the recipe and create a mix of flavors for every occasion.
Another advantage is that cake pops are easy to store. After you dip them in melted chocolate or candy melts and let the coating harden, you can keep them in the fridge for several days or freeze them for longer. This means you can prepare a bigger batch ahead of time, then thaw only what you need. They also travel well, so they’re perfect for bake sales, potlucks, or birthday parties. If you want to bring a smile to anyone’s face, you can’t go wrong with these portable and colorful pops.
Ingredients
Before you make cake pops at home, it helps to prepare a clear ingredients list. Below is a flexible set of items that you can combine and customize. Once you have the basics ready, you can pick any flavor variation—chocolate, vanilla cake, red velvet, lemon, cinnamon, or funfetti—to give these bite-sized treats a unique taste and look.
Base Ingredients
- 1 standard cake mix (about 9×13-inch size)
You can use boxed cake mix or your own homemade recipe. Popular choices include vanilla cake, chocolate cake, funfetti, or red velvet. Make sure you let the cake cool completely before crumbling. - Frosting (about ½ to 1 cup)
Choose between buttercream, vanilla frosting, or chocolate frosting. If you have leftover frosting from a previous batch, that often works perfectly. The goal is to create a moist crumb mixture that can hold its shape. - Candy Melts or White Chocolate (about 12 ounces)
These provide the sweet coating for your cake pops. You can also use semi-sweet or milk chocolate. If the melted coating seems too thick, stir in a small amount of coconut oil to thin it out. - Cake Pop Sticks (about 20–30)
Available in baking aisles or craft stores. These help you dip and decorate the cake pops easily. - Optional Toppings
- Cookie crumbs (for crunchy texture)
- Sprinkles (rainbow, confetti, or holiday-themed)
- Gel food coloring (to color white chocolate or frosting)
- Drizzle of melted chocolate in contrasting shades
Optional Flavor Boosters
- Chocolate Cake Pop:
Start with a chocolate cake base and pair it with chocolate frosting. - Vanilla Cake + Lemon Zest:
Add fresh lemon zest to your vanilla frosting for a bright, tangy flavor. - Red Velvet + Cream Cheese Frosting:
Use red velvet cake and whip it together with cream cheese frosting for a classic bakery taste. - Funfetti:
Bake a confetti cake mix and use vanilla frosting topped with rainbow sprinkles. - Cinnamon Twist:
Mix a small amount of ground cinnamon into a basic white cake base, then pair it with vanilla or buttercream frosting.
Helpful Notes
- Room Temperature:
Let your frosting sit out until it’s at room temperature. Cold frosting can make the cake mixture harder to form. - Batch Size:
One 9×13-inch cake typically yields 20–30 cake pops, but you can easily adjust the batch once you calculate how many you need. - Consistency:
Aim for a cake and frosting mixture that’s sticky enough to roll without falling apart, yet not overly soggy. If it’s too dry, add frosting a spoonful at a time. - Sheet Lined with Parchment Paper:
This simple tool makes cleanup easier and helps the pops not stick to the tray. - Fridge or Freezer:
Chill the shaped pops briefly for easier dipping. You can freeze them longer if you’re prepping ahead of time.
With these ingredients on hand, you’re ready to form, dip, and decorate your pops to match any occasion. The next section will give you step-by-step instructions so you can assemble everything smoothly.
How to Make Cake Pop Flavors
If you’ve gathered all items on your ingredients list, you’re ready to begin this cake pops recipe. Below is a straightforward method to make cake pops at home, whether you’re aiming for a classic cake or a more daring flavor like red velvet or funfetti. By following these steps, you can create a moist crumb texture that holds its shape and delivers sweet satisfaction in every bite.
Step 1: Bake and Cool the Cake
- Prepare your cake base
Use your favorite homemade recipe or a box cake mix. You can go with vanilla cake, chocolate, red velvet, funfetti, or a simple cinnamon-infused batter. - Let the cake cool completely
Pull the cake from the oven and set it aside. Always let the cake cool completely before crumbling, since steam or warmth can cause the cake pops to lose their structure later.
Step 2: Crumble the Cake
- Break it down
Once your cake is at room temperature, use your hands or a fork to crumble it into a large bowl. Move slowly to avoid big lumps. Using your hands is the simplest way to get an even crumble. - Check texture
Look for a fine consistency that easily packs together. Overly large chunks could cause the cake pops to crack when shaping or dipping.
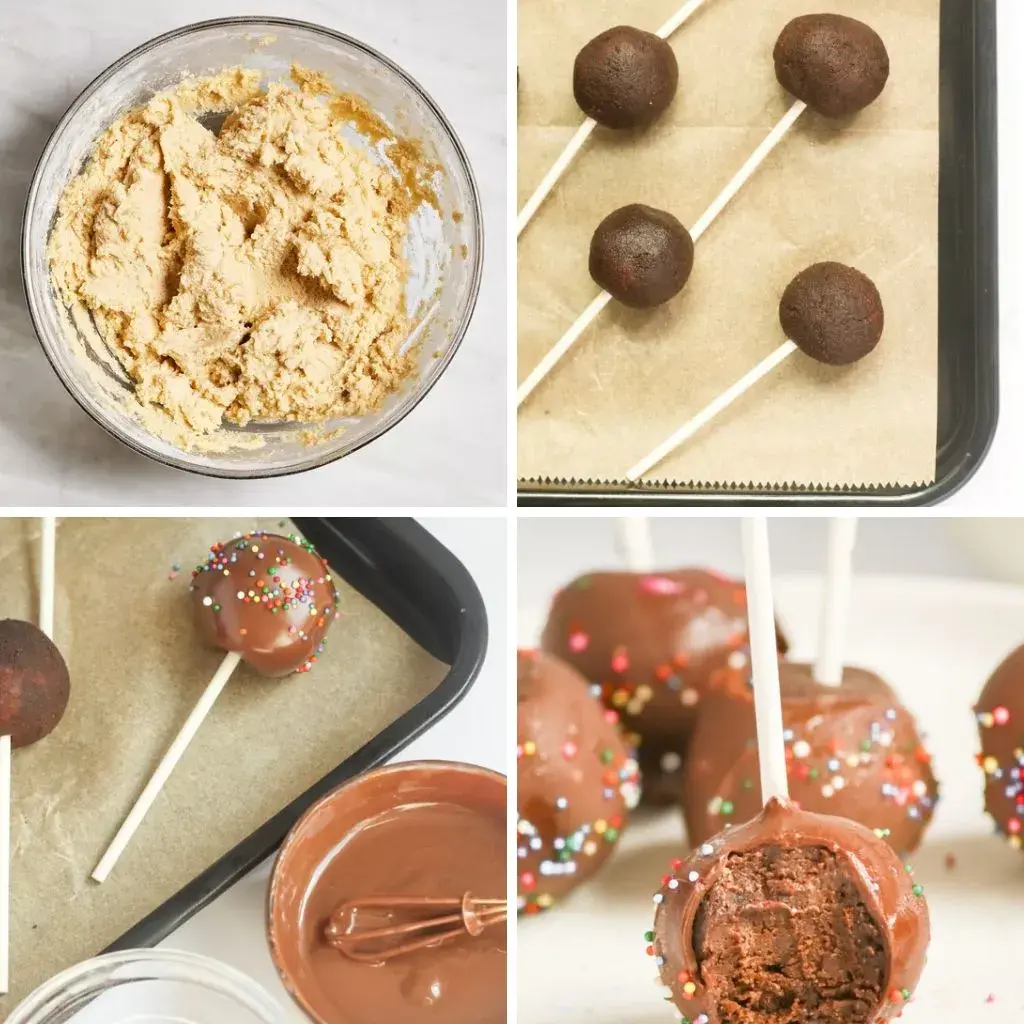
Step 3: Add Frosting and Form the Mixture
- Combine cake and frosting
Add about ½ cup of buttercream or vanilla frosting to your crumbled cake. If you prefer a homemade approach, whip up a simple buttercream. Stir this gently until you have a sticky yet not soggy cake mixture. - Adjust if needed
If it’s too dry, add frosting by the spoonful. If it’s too soft, add more crumbled cake. The mixture should hold its shape when pressed together. - Flavor Boosts
- Chocolate cake pop: Use chocolate frosting to deepen the flavor.
- Lemon flair: Stir a little lemon zest into vanilla frosting.
- Cinnamon swirl: Add a pinch of cinnamon for extra warmth.
- Funfetti: Fold in rainbow sprinkles or confetti cake bits.
- Birthday cake pop: Add colorful sprinkles to mimic a party vibe.
Step 4: Shape Into Balls
- Roll the mixture
Scoop a small handful of the cake mixture (about one tablespoon each) and roll it gently into a smooth ball. Place them on a sheet lined with parchment paper or a cookie sheet lined with parchment to prevent sticking. - Chill briefly
Transfer the tray to the fridge for about 1 hour or the freezer for 15 minutes. This helps the pops firm up so they won’t collapse when you insert the sticks. - Size check
Each cake pop ball should be even, so they dip uniformly in melted chocolate or candy melts later.
Step 5: Prepare Your Coating
- Melt your chocolate or candy melts
In a microwave-safe bowl, warm white chocolate, candy melt wafers, or semi-sweet chocolate in 20- to 30-second bursts. Stir thoroughly in between each round to avoid burning. If it’s too thick, add a small spoonful of coconut oil and stir again. - Check temperature
Don’t let your coating get scalding hot. A moderate warmth ensures a smooth dip. - Color options
If you’re creating multiple flavors or holiday themes, add gel food coloring to white chocolate or pick candy melts in various shades.
Step 6: Insert Sticks and Dip
- Insert the sticks
Take one pop from the fridge. Dip the tip of a cake pop stick in melted chocolate, then insert it about halfway into the ball. This helps anchor the stick. - Dip each pop
Gently lower the pop into the melted chocolate or candy melt. Make sure it’s fully covered. Lift it out and tap lightly on the edge of the bowl to remove excess chocolate. - Add toppings while still wet
If you plan to decorate with cookie crumbs, sprinkles, or a drizzle of contrasting chocolate, sprinkle them on the coating while it’s still wet. This ensures they adhere properly.
Step 7: Set the Coating
- Use a cake pop stand or styrofoam block
Place the cake pops upright so the coating can dry without smudging. - Wait until the coating has hardened
Let the pops stand at room temperature for a few minutes or place them in the fridge. Once the coating has hardened, they’ll be solid and ready to serve. - Decorate further if desired
Some bakers add a second layer of melted chocolate after the first layer cools. You can also pipe on thin icing designs or add a crunchy finish with leftover cookie crumbs.
Step 8: Storing and Serving
- Chill or freeze
Transfer any extra pops to an airtight container. They can keep in the fridge for about 1 week or in the freezer for 1 month. Thaw them in the fridge if frozen. - Enjoy at gatherings
These bite-sized pops are great for any occasion, whether it’s a birthday party, a simple family dinner, or a casual potluck. Guests will gladly sink your teeth into these sweet treats—no plates or forks necessary. - Leftover coating
If you have leftover melted chocolate, you can store it in a sealed container and reheat gently for another dessert later.
Step 9: Presentation Ideas
- Cake Pop Stand
A cake pop stand helps display your pops upright and keeps them from smudging. - Styrofoam Block
If you don’t have a stand, use a clean styrofoam block to hold them while they dry. - Wrap Individually
For a birthday cake pop gift bag, wrap each pop in clear cellophane and tie with a ribbon.
5. Pro Tips and Variations
There are many ways to get creative with cake pops. By making a few small changes, you can bring fresh life to this simple sweet treat, whether you love bold flavors like red velvet or something gentle like a vanilla cake. Below are helpful insights and fun twists you can try at home.
1. Handling and Shaping
- Keep Hands Clean and Slightly Damp
When you roll the crumbled cake mixture, bits may stick to your palms. Rinsing your hands in cool water and drying them thoroughly before each round makes the rolling process smoother. - Use a Cookie Scoop
If you want each pop to be uniform, a cookie scoop ensures that every ball has the same size. This step also helps the pops bake and dip evenly.
2. Dipping Techniques
- Test the Temperature
Melt chocolate or candy melts in short intervals until smooth. If it’s too hot, the coating might cause the cake ball to slip off the stick. Aim for a comfortably warm temperature so the chocolate coating sticks securely. - Excess Chocolate Removal
Give the stick a gentle twirl or tap on the side of the bowl to let the extra coating drip off. Avoid shaking the pop too hard, or it might crack or fall. - Add Toppings Promptly
Sprinkle cookie crumbs, funfetti, or extra decorations right after dipping. Once the coating sets, toppings won’t stick.
3. Using Candy Melts vs. White Chocolate
- Candy Melts
They come in many colors, making them ideal for holiday themes or birthdays. Candy melts also tend to dry slightly faster, which can be handy for quick batches. - White Chocolate
If you prefer a creamier, richer coating, real chocolate is a delicious choice. You can thin it with a little coconut oil and add gel food coloring to customize the hue.
4. Flavor Variations
Cake pop flavors can range from basic chocolate to bright, tangy lemon. Below are a few suggestions to spark new ideas:
- Chocolate Overload
- Base: Chocolate cake + chocolate frosting
- Coating: Melted chocolate or dark candy melts
- Finish: Sprinkle crushed cookie crumbs or mini chocolate chips on top
- Lemon Burst
- Base: White or vanilla cake + lemon zest in the frosting
- Coating: White chocolate tinted with a drop of yellow gel food coloring
- Finish: Top with a drizzle of lemon icing for extra brightness
- Red Velvet Classic
- Base: Red velvet cake + cream cheese frosting
- Coating: White chocolate or red candy melts
- Finish: Contrast with a dark chocolate drizzle to create bakery-style pops
- Cinnamon Sugar
- Base: Vanilla cake + a pinch of cinnamon in frosting
- Coating: A mix of white chocolate and cinnamon dust
- Finish: Roll lightly in cinnamon-sugar before the coating sets for a crunchy spin
- Funfetti Confetti
- Base: Funfetti or confetti cake + vanilla frosting
- Coating: White candy melt
- Finish: Add rainbow sprinkles for a birthday cake pop that looks party-ready
5. Storage and Make-Ahead Tips
- Freezing the Shaped Pops
After rolling the cake mixture into balls, place them on a sheet lined with parchment paper and freeze for up to 1 month. Thaw them in the fridge when you’re ready to dip. - Short-Term Storage
Once dipped, keep your pops in an airtight container in the fridge for about 1 week. This preserves freshness and prevents the chocolate coating from softening too much. - Overnight Planning
If you’re hosting a big occasion, shape and chill your pops overnight. Then, on the event day, simply dip and decorate.
6. Personalized Finishing Touches
- Drizzle or Dip Twice
For eye-catching designs, dip the pop in a base color and allow it to set. Then drizzle a second color in thin lines or zigzags. This trick works well with chocolate cake pop or red velvet bases, as the bright drizzle stands out. - Edible Glitter or Metallic Accents
If you want a festive look for wedding or anniversary parties, add a gentle dusting of edible glitter. Use caution—too much can overwhelm the flavor. - Little Gift Packs
Present each pop in a small treat bag with a ribbon. This idea is perfect for special gatherings or as a thank-you gesture for friends and family.

6. Serving Suggestions
Serving cake pops can be as straightforward or as fancy as you’d like. Each small treat is already in a convenient bite-sized form, which makes them easy to distribute on trays or platters. Yet, a few thoughtful styling choices can make them stand out and look even more appealing.
- Styling on a Stand
- Display: One simple way is to place the cake pops in a cake pop stand or a clean styrofoam block. This not only prevents them from touching each other but also creates a lively vertical arrangement.
- Color Coordination: If you’re offering multiple cake pop flavors—like red velvet, chocolate, or confetti—it can help to group them by color. You can add small name tags or labels for clarity.
- Arranging on a Platter
- Lay Flat: If you’d rather skip the stand, lay them flat on a platter lined with parchment paper or a decorative doily. It’s a simple approach and still highlights the glossy coating and colorful toppings.
- Mix It Up: Combine your cake pops with other sweets, such as cookies or brownies, to form a dessert sampler tray. This creates a variety of textures and flavors in one display, pleasing guests who want to try different treats.
- Special-Occasion Centerpiece
- Wedding or Shower: For fancy events, arrange cake pops in a sturdy vase or wide glass. Wrap the sticks with ribbons that match your theme colors. Consider using white chocolate coating with pearl-like sprinkles for an elegant look.
- Birthday Celebrations: To create an extra-festive birthday cake pop, roll bright sprinkles onto your pops before the coating sets, then pop them in a display that suits the party’s color scheme.
- Individual Wrappings
- Take-Home Favors: If you’re making a birthday cake pop or a themed pop for a holiday, you can package them in small cello bags secured with twist ties or ribbons. That way, friends and family can easily take them home without mess.
- Labeling: Write simple flavor labels—like “Vanilla Cake” or “Red Velvet”—so people know what they’re choosing. This is especially helpful when you have a batch with multiple tastes.
- Serve with Accompaniments
- Coffee or Hot Cocoa: Cake pops work well alongside a warm beverage, especially chocolate or red velvet variations. Set out a small coffee station so guests can pair these rich treats with their preferred drink.
- Seasonal Themes
- Holidays: Around festive seasons, color-code your pops to match the theme—red and green for Christmas, pastels for spring gatherings, or orange-and-black for Halloween.
- Sprinkles or Cookies: Crumble seasonal cookies—like gingerbread in winter or lemon shortbread in spring—and press the crumbs onto the coating before it fully sets. This adds flavor plus a fun holiday vibe.
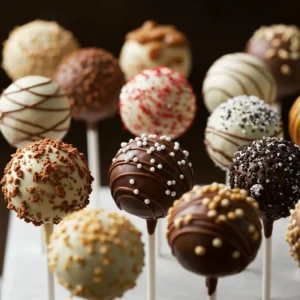
- Boosting Visual Appeal
- Drizzle Contrasts: A zigzag drizzle of melted chocolate on white-coated pops (or vice versa) draws the eye. It signals flavor variety and adds a professional finish.
- Sprinkle Layers: If you’re feeling creative, roll the pops in multiple sprinkle types. For example, start with fine sprinkles, then top them with a few chunky confetti pieces for textural interest.
- Temperature Tips
- Warmer Settings: If you’re serving outside on a hot day, keep your pops chilled until the last moment. This helps maintain a firm coating.
- Indoor Gatherings: At room temperature, the chocolate coating softens slightly, which many find more enjoyable to bite into. Gauge your serving time so the texture stays perfect.
- Making It a Fun Activity
- Decorating Station: If you’re hosting a kids’ party, consider a mini decorating station. Provide bowls of melted candy melts, sprinkles, and cookie crumbs. Kids can dip half-formed pops or add finishing touches.
- Hands-On Fun: Invite guests to shape and dip their own cake pops. It becomes an interactive party element and ensures everyone’s personal taste is met.
Cake pops bring a sense of delight that few other sweets can match. They’re simple to assemble, fun to customize, and always exciting to eat. Whether you prefer classic chocolate or vanilla, crave the tang of lemon, or enjoy the warmth of cinnamon, you’ll find endless ways to create flavors that please every palate. By mixing basic cake crumbs with a bit of frosting, you can transform leftover cake into vibrant pops topped with sprinkles, cookie bits, or colorful drizzles.

Their bite-sized form makes cake pops a practical dessert for gatherings big or small. They’re straightforward to store, easy to transport, and flexible enough for any event—from birthdays to office parties. And if you like to plan ahead, you can shape and freeze your pops, then thaw and dip them in candy melts or melted chocolate whenever you’re ready.
Whether you’re aiming to please a crowd or experimenting with new flavors in your own kitchen, cake pops are a fantastic way to add a touch of sweetness. You can keep them simple or turn them into an edible art project. The key is to let your personal flair shine through in each dip, drizzle, and garnish. With the guidelines you’ve learned here, you’ll have the confidence to craft batches of moist, tasty pops that fit any occasion. And as you continue to explore new twists, you’ll discover countless ways to spread happiness with these small, cheerful treats.
What are good flavors for cake pops?
Almost any traditional cake flavor can become a great cake pop. Chocolate, vanilla, red velvet, and lemon are popular choices that pair beautifully with candy melt or chocolate coatings. Variations like funfetti, cinnamon, or even cookie-based combinations (such as Oreo crumbs) also add variety. It helps to match your cake and frosting flavors for consistency, then top with sprinkles or drizzles that elevate the final taste.
What is the most popular cake flavors?
Chocolate and vanilla often rank as the top picks. Many people also enjoy red velvet for its bright color and subtle cocoa taste. Funfetti, which incorporates rainbow sprinkles, comes in as another crowd-pleaser—especially for celebrations. Ultimately, your personal preferences and the occasion will guide your choice.
What flavor cake pops does Starbucks have?
Starbucks typically offers a small but recognizable assortment of cake pops, such as the Birthday Cake Pop (a sweet vanilla flavor with sprinkles), Chocolate Cake Pop (rich chocolate base with a chocolate coating), and sometimes limited-time seasonal choices like confetti or cookie dough-inspired pops. Their menu can vary by location, so you may see different options depending on the time of year and region.
What is on cake pops?
Cake pops usually have a smooth outer coating made from melted chocolate or candy melts. Once dipped, they can be decorated with sprinkles, cookie crumbs, or a drizzle of contrasting chocolate. Inside, you’ll find a mixture of crumbled cake and frosting that creates a moist, dense bite. The combination of flavors and textures makes them easy to enjoy.
Are cake pops expensive?
Prices vary, but cake pops can sometimes cost more per piece than a standard slice of cake. This is because of the labor involved in baking, crumbling, shaping, dipping, and decorating each pop. When purchasing from a shop or bakery, you pay for the craftsmanship and time it takes to make these bite-sized sweets. If budget is a concern, making them at home is often more cost-effective.
What flavor is the birthday cake pop?
The classic birthday cake pop has a vanilla-flavored interior—often with bright sprinkles mixed in—covered in a sweet, sometimes pink or white coating. You’ll see colorful sprinkles on top to give it a festive look. The overall taste is usually similar to a traditional vanilla cake with frosting, capturing that celebratory feel in a small package.
Cake Pop Flavors:
Ingredients
Base Ingredients
- 1 standard cake mix about 9×13-inch size
- Frosting about ½ to 1 cup
- Candy Melts or White Chocolate about 12 ounces
- Cake Pop Sticks about 20–30
Optional Flavor Boosters
- Chocolate Cake Pop:
- Vanilla Cake + Lemon Zest:
- Red Velvet + Cream Cheese Frosting:
- Funfetti:
- Cinnamon Twist:
Instructions
- Bake and Cool the Cake
- Crumble the Cake
- Add Frosting and Form the Mixture
- Shape Into Balls
- Prepare Your Coating
- Insert Sticks and Dip
- Set the Coating